How to make a Dog Collar

There's no feeling in the world like making an article of clothing for a family member. As a beloved part of your family, making your dog a collar can also provide a great feeling.

Collars made from these ribbons make them special and although they are hard wearing and stand up to quite a bit of ruff and tumble I'd say they are more for a run in the park rather than an afternoon at the river. Great for gifts, one can never have too many collars after all... The only time I had one returned to me was because the dog was dipping in and out of the Caribbean continuously and the salt rusted my metal hardware!..but the actual fabric part withstood the soakings surprisingly well.
These collars are a bit of a fashion statement with so many different ribbons styles to choose from.
Enjoy the new offering of the starter and deluxe kits - it really is a great idea and is a such a time and cost effective way of getting the different elements together.
We offer 2 kits: a Starter Kit and a Deluxe Kit.
The starter Kit
- 3 yds of 1" webbing (classic colors black, red and tan) coordinated to
- 2 yd of ribbons ( popular tan plaid and Tula Pink Lantern design) with
- 4 sets of hardware ( you can make 2 custom Ribbon Dog Collars!)

De Luxe kit:
- 6 yd of different colors 1" poly pro sturdy webbing and
- 6 yd of best Designer ribbons for dog collars all in 7/8" width!
- 12 sets of Hardware ( each set has 3 components)
We'll include a basic set of instructions in your kit, but be sure to browse around and get familiar with some tutorials. Our favorite source for free tutorial is always Sew4Home- see below.
Check out this full photo tutorial on Sew4Home:
"Webbing, ribbon, hardware, a couple of hours, and you can make your very own boutique style dog collar and leash. This is such a fun and easy project, you'll be offering to make them for all your canine friends.
See the full tutorial on Sew4Home
How to make a Dog Collar
Take your pup walking in style this year! With our beautiful ribbon, hardware, webbing, and a couple of hours you can make your very own boutique-style dog collar and leash. This is such a fun and easy project, you’ll soon be offering to make them for all your canine friends! We chose Renaissance Ribbons for the ultra-stylish ribbon on both our sets. We even added a couple cute embellishments to each of our samples. There’s a slip-on bow tie for the dapper dog, and a set of pompoms and jingle bells for the party animal.
We chose the metal ring rather than the plastic ring featured in the tutorial.

Fun simple illustration of the main steps:

Before you start your collar here are some sewing guidelines:
Time to review your stitching
These stitches will be used in a minute to create a secure and sturdy dog collar. If you are a new sewer, you may want to practice these stitches on some scrap fabric before trying it on your new dog collar. First up is the Triple Stitch:
-
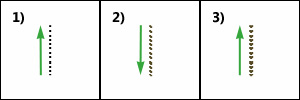
Triple Stitch
- Stitch forward.
- Then backstitch.
- Then, stitch forward again.
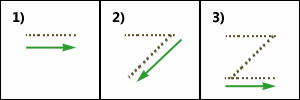
Z Stitch
- Perform a triple stitch.
- Turn it at a ~45°, then backstitch.
- Then, perform another triple stitch.
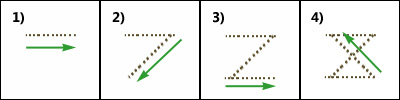
Box Stitch
- Perform a triple stitch
- Turn it at a ~45°, then backstitch.
- Then another triple stitch.
- Another 45° angle, then back to where you started.
1 Add Your Triglide
-
Slide our triglide on, weaving it through the dog collar. This is done by slipping the webbing up through one side of the triglide, over the center bar, and back down through the other slot. Leave about an inch on one side to loop back under the triglide.
-
Sew On The Triglide
Sew the triglide in with a Box Stitch ( As seen in Step Ten ) It should now be at the very end of your dog collar.
-
Add Your Buckle
Slide the male end of the side release buckle onto the dog collar. First insert the webbing from the bottom of the buckle through the inner slot, over the crossbar then down through the outer slot. Pull it all the way up to the triglide. The male prongs should face the triglide.
-
Back Through The Triglide
Now weave the webbing back through the triglide. This should lock the male end of the buckle in a loop made by the collar and triglide.
-
Add Your D-Ring
Slide the D-Ring onto the dog collar. It doesn't matter where it ends up at this point.
-
The Other Half Of The Buckle

Take the female end of the buckle and slide it up to your desired collar length. ( See the chart at the beginning of this How To for the finished length ) For all collar sizes except Mini, go ahead and Triple Stitch the female buckle end in place.
- Tip on sealing the Webbing ends:
Nylon, polypropylene, and polyester webbing can all be sealed using an open flame. Hold the end of your webbing close to but not directly in the fire. Sweep the material back and forth close to the flame to evenly seal the ends. Do not catch the webbing on fire as it will create a burnt look on the end of your webbing.
As seen on the Country Book Design website
STEP BY STEP Tutorial
Dog Collar Instructions Plus Tips. From Sew4Home Featured Project
- You have received all the supplies needed to make dog collars. In addition to these supplies, you might want to get ½ inch Pellon Lite EZ Steam II. (This is like Wonder Tape but wider and is sold at JoAnn Fabrics)
- Cut webbing at 30”
- Melt the cut ends of the webbing to prevent fraying. To do this, simply pass the end of the webbing through the flame of a lighter or candle several times. It doesn’t take much heat.
- Cut ribbon at 32”
- Thread your machine using invisible thread on top and bottom. If your machine can’t handle the invisible in the bobbin, just use a thread color that matches.
- Adhere a strip of fusible seam tape (EZ Steam II) to the center of the webbing. Lay the ribbon on top, right side up, centered. (There will be ribbon extensions on each side)
- Wrap the ribbon extensions to the back and adhere with a small piece of EZ Steam II. (If it lifts, no worries, it will be sewn down later)
- Stitch ribbon to the webbing, using an edge stitch, making sure you catch the edge of the ribbon. I used an even feed walking foot for this step.
- With a tape measure laying flat on the table.
- Thread the collar through all the hardware. First slip on the D-ring and the slide, then thread EACH collar end through one half of the buckle. Female piece (the one with prongs) on the right side and the male side (no prongs) on the left.
- Fold the ends until the length equals your finished length. (20”for the sample) NOTE: the buckle counts so add one buckle width when calculating the 20”.
- The fold back that will have the adjuster should be 8” on left side; 3” on right.
- Feed the 8” end back through the back side of the slider. Fold back a small amount and sew the slider buckle in place. Make sure you sew to the slider side not the side that is sliding through. Stitch through all thicknesses twice ¼” apart.
- On the right side, making sure the D-ring is next to the right buckle, Sew the end (3” side) in place, using two rows of stitching through all thicknesses.
- Move the D-ring so it is snug against the stitching you just did, and sew as close to the D-ring as possible, doing the same 2 row stitching.
- OOH La La you are finished!! Congratulations!!
- The tutorial has instructions for an optional leash and?or a larger dog collar with 1 ½” ribbon.
Learn more precisely what is what! Pets - Glossary
- D-Ring
- Hardware item, either plastic or metal, depending on the required strength, shaped like the letter D. Used at the end of a strap to create a loop. Two Dee rings together can create a mechanism for varying the size of the strap.
- Half Check Collars/Chains
- A half check collar has a small length of chain connecting the strap of the collar. It will tighten when the dog pulls, but not enough to choke (as long as it is set up correctly). They are often stronger than regular flat collars, and, perhaps most usefully they prevent the dog from backing out of the collar.
- Harness
- A collar that straps to the body of the dog, part in front of the front legs, part behind. Beneficial because it increases safety, both by reducing risk of the dog escaping and taking the pressure off the neck and throat.
- Keepers
- Used to keep loose ends of webbing in place after it's been threaded through a tri-glide, tension lock, or similar.
- Key Fob
- Something attached to a set of keys. These can be sentimental or utilitarian in design, and help prevent loss and personalize keys. Dog breed ribbon can be used to create a key fob that reminds you of your best friend.
- Martingale Collar
- Specialty collar designed for breeds whose head is smaller than their neck, making it easy to slip out. Martingale's are similar to the half check collar, but made of fabric or webbing. The design keeps the dog safe without the risk of choking or tangling in fur.
- Nylon Couplers
- A handy piece of equipment that allows a dog owner to connect two dog collars together, and walk them simultaneously without the risk of tangled leashes.
- O-Ring
- O shaped hardware used as a connector. Often used as a connection between a leash and collar or at the end of a lanyard to connect keys.
- Side Release Buckle
- A connector formed by a male/female pair. The male piece has a straight guide with hooks on either side that, when inserted into the connection, form a lock. When the two side hooks are pushed together the pieces are easily separated.
- Snap Hook
- Hooks with a sliding bar that close off the opening, making them more secure. Often found on the end of a strap, leash, or lanyard to connect to another piece.
- Tri-glides
- A piece of hardware with three parallel bars connected at the ends, used to adjust the length of strap by folding it over on itself. Commonly found in over the shoulder straps.
- Webbing
- Strong fabric woven into a flat strip or tube. Webbing has been made from cotton and other natural fibers, but is most commonly made with synthetics such as nylon or polypropylene. Because of its light weight, exceptional strength and relatively low cost, its uses are versatile and virtually endless.
do you have any tips to stop the ribbon from fraying/bobbling with use? (the middle not the end bits) such as a fabric fixing spray?
i am very interested in making leashes and dog collars for my two fur babies. When will the kits be available again.
Thank you
Gail Lumus
A dog collar video would be great!
Dog collar kit
Will the collar kits be back in stock any time soon?
Leave a comment